Pages

Tuesday, March 27, 2012

Home Sweet Home QAL - Three Trees Block

Happy Tuesday, everyone!  And...if you're joining me from Kim's Crafty Apple for the Home Sweet Home QAL...WELCOME!  I hope you enjoy this block.  I had fun making it.  The step-by-step tutorial is listed below, but if' you'd like to print out a pdf version (pictures excluded), please click here.  Also, if you want to turn off the music, please scroll to the bottom of my blog...you can mute the player there.  =)


Three Trees Tutorial
by Anna M. aka Around the Quilt Block
Finished block size 12” square

Supplies:
· Background fabric – 1/4 yard (or one 7.5” x WOF strip)
· Print for checkered border—1/8 yard
· Three 2” x 3” scraps for trees (or cut scraps to this size)
· Three 0.5” x 2.25” scraps for tree trunks (or cut scraps to this size)
· Double stick light fusible web (i.e., Lite Steam-A-Seam 2)
· Embroidery floss in coordinating colors (optional)

Note: all seams are to be sewn with a 1/4” seam allowance.


Cutting Instructions:
· Background fabric—7” x WOF strip (cut in this order):
         - (1) 7.5” x 7.5” square (center background for trees)
         - *(2) 1.5” x remaining WOF (about 33-34”) for checkered border
- (2) 11” x 1” strips (outer border) - if desired, you can make these a little wider to trim to size after sewing
- (2) 12.5” x 1” strips (outer border) - if desired, you can make this a little wider to trim to size after sewing

· Checkered border fabric:
- (2) 1.5” strips in the same length as those cut for the background fabric marked with (*) above


Block Instructions:
· Center tree block:
         - Following instructions on fusible web package, stick on fabric scraps right side up for trees and tree trunks.  Fusible web has paper backing on both sides...one side will come off easily and one side won’t.  


Remove the paper from the side that comes off easily and press your fabrics onto the fusible web (DO NOT use an iron at this point...just press them on with your fingers.  Leave some space between the fabrics so you can cut them out.


After you’ve pressed them all on, cut them out.  


Fold each tree in half lengthwise and finger press at one end. 

Using the mark that you just finger pressed, cut from the lower right-hand corner to the mark. 


Repeat to cut from the lower left-hand corner to the mark.  You should now have a tree shape.
 

 Repeat with all of the trees.  You should have three trees and three trunks.
 

Fold the 7.5” x 7.5” background square in half and finger crease the center.  Unfold and fold in half the other way and finger crease the center. 

Peel the remaining paper off the fusible web backing for the trees and tree trunks.


Center the middle tree on the block, sliding the tree trunk under the tree just slightly to hide that edge.  
With bottom corners of trees touching, place remaining trees and tree trunks on either side of the center tree.  Be sure not to go into the seam allowance on the white square. 


Once you are satisfied with your tree/tree trunk placement, press the trees/tree trunks with an iron to set their placement.


Checkered border:
         - Sew one 1.5” wide background strip to one 1.5” wide print strip, matching right sides together.   

Repeat with remaining 1.5” wide background and 1.5” wide print strip.

Press towards darker fabric.


 Cut strips into 1.5” segments.


Sew 1.5” segments into strips, alternating print and white fabrics.  You will need to make (2) strips of seven segments (should end up 7.5” long after sewn together) and (2) strips of 11 segments (should end up 11.5” long after sewn together).

Press as desired.


Block Assembly:
Lay the checkered border strips around the center square, to ensure print squares alternate.  

 Once satisfied with layout, sew one 7.5” checkered strip to each side of the center tree square.  

Press towards center block.

Sew remaining 11.5” checkered strips to top and bottom.  Press towards center block. 


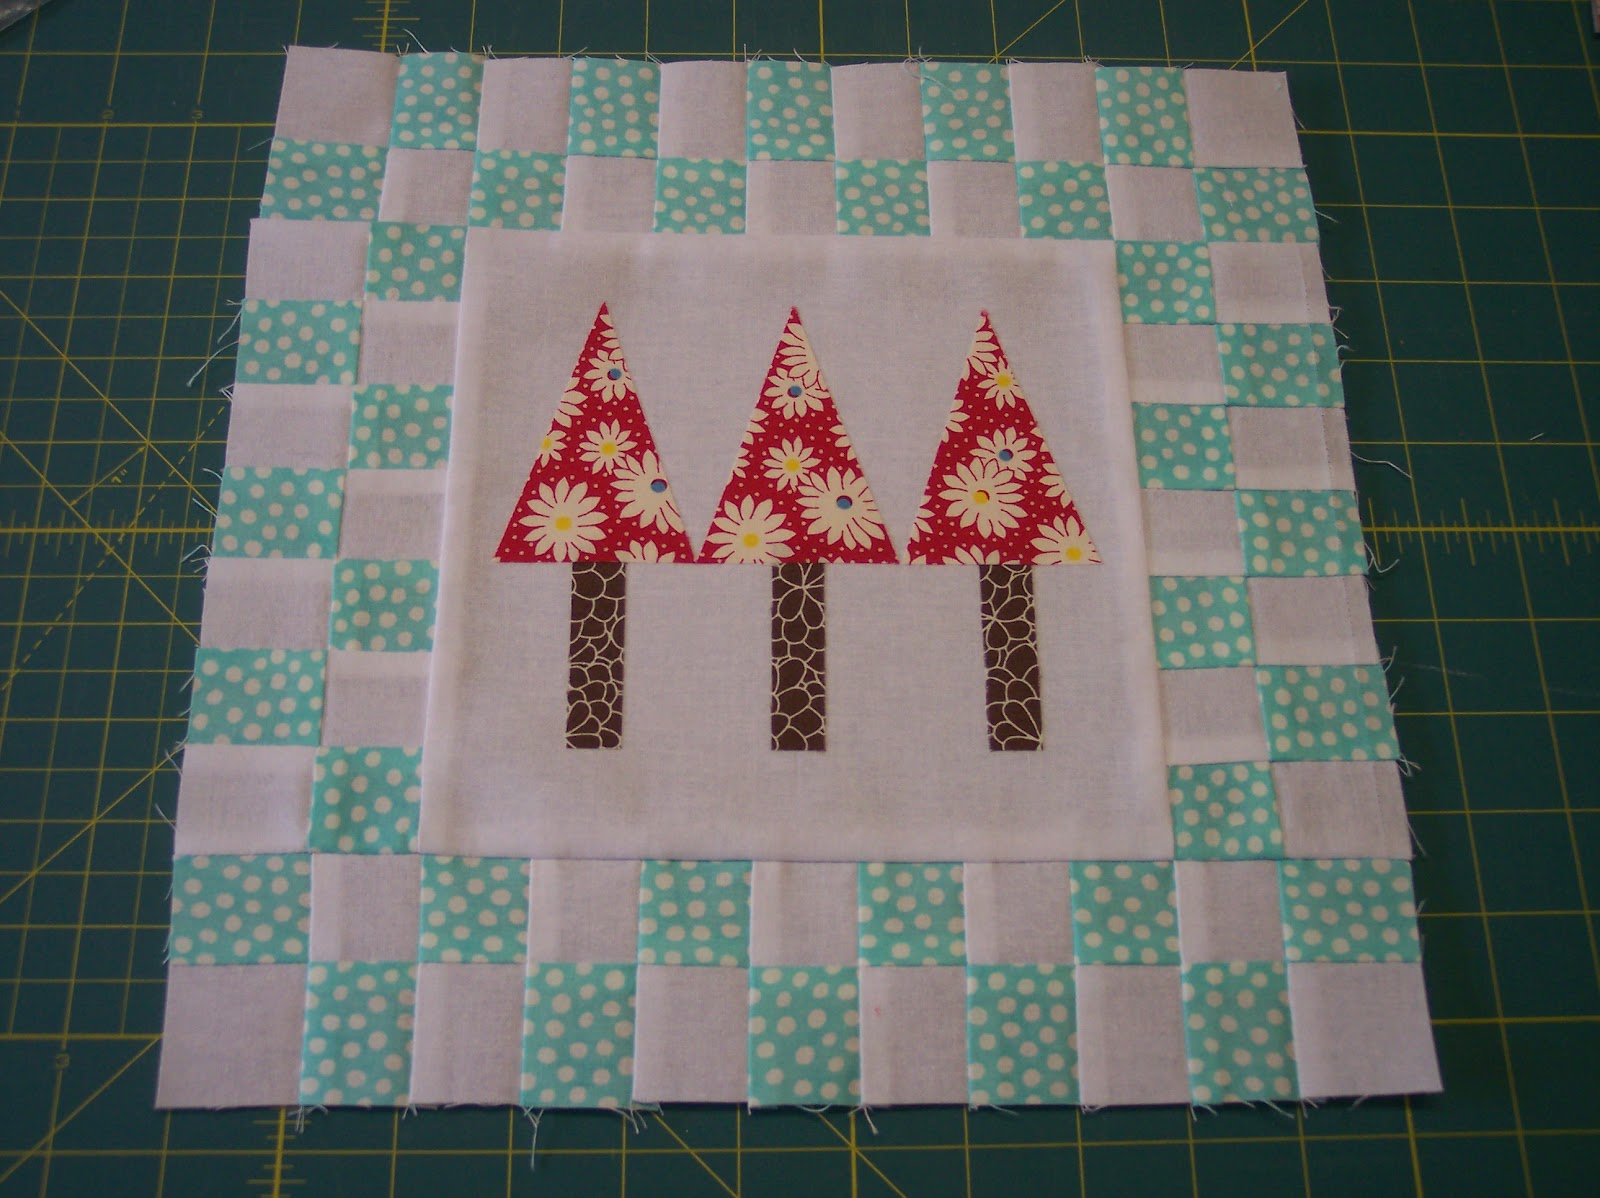
Sew one 1” x 11.5” background strip to checkered border on each side of block.  Press towards background fabric (outer border).


Sew one 1” x 12.5” background strip to checkered border on top and bottom of block.  Press towards background fabric (outer border). 

Block should measure 12.5” square.


Enjoy your block!!!


Optional:
Use embroidery floss to outline stitch around trees and/or checkered border.  (I'll be stitching around each tree and each check in the border with embroidery floss once I have my quilt top completed.)

If you make my block, please leave a comment and let me know.  Also, if you have any questions with the tutorial, please let me know and I'll answer your question as soon as possible.

Thanks again for stopping by!!!!  =)  Make it a great day!
Saturday, March 24, 2012

February 2012 Wrap-up

This is what I was up to during February:

Joined the Modern Quilting Group at Broadbent's in Lehi...so excited for the next 6 months of these classes.  The first one was so inspiring with all the different ways we can use our black & white fabric bricks we got when we signed up for the class.  I think I'll use mine to make a quilt for Rick...hard to decide on a pattern, though.

I made this block for the Quilts for Cancer bee.  It is by Elizabeth Hartman (Oh, Fransson!) and the pattern is called Octagonal Orb.  The pattern can be found here

This one I made for the Beginner Modern Minx Bee.  The pattern is called Three Wishes and it's from the 99 Modern Blocks book.

I also finished all of the blocks for the Geese in a Ring Swap:

I also participated in the 4x5 Fabric Charm Swap.  These are the fabrics that I sent:

The red fabric is Treasures and Tidbits Red Circle Dots by Piece O' Cake Designs for Robert Kaufman Fabric and the green fabric is Power Pop Peridot Thirteen by Jenean Morrison for Free Spirit Fabrics.

I also sent in this fabric for a Polka Dot Charm Swap:
It is Hullabaloo Yellow Circle Dot by Urban Chiks for Moda. 

Still need to work on my 3x6 and 4x5 blocks...I think I've narrowed down the patterns...

January 2012 Wrap-up

I had a few bee blocks to make during the month of January.

This one was for the Modern Minx Beginner Bee.  The block is called Envy and it's from the 99 Modern Blocks book.

These were for the Sew.Happy.Geek QAL (I'm really into solids right now):
 This is the first block I made for the Geese in a Ring Swap.  It was my test block and I was just going to keep it, but one of the members of the swap asked if it could be her block.  The pattern is by Piece by Number and can be found here.

I really enjoyed making all of them.  I especially love the Geese in a Ring because it was paper-pieced...and paper-piecing always makes for a great block. 

We also started a new round of the 3x6 Bee...and I signed up to be in the 4x5 Modern Bee...so I'll have to work on getting those blocks finished. 


Thursday, January 12, 2012

Sally's Prize!

Wondering which book Sally picked as her prize from the giveaway?  She selected this one:
Photo courtesy of Barnes & Noble website - click here for more info


A brand new copy of this book is on its way to her home.

I hope you enjoy it, Sally!  It's full of great blocks from very talented designers.  Thanks again to everyone who entered my giveaway! 
Monday, January 9, 2012

And the Winner is....

Thanks to everyone who entered my giveaway!  You all have wonderful goals/resolutions/whatever you want to call them for the year...some I even copied for myself!  Well, without any further delay, here is the winner:

Random Integer Generator

Here are your random numbers:
18
Timestamp: 2012-01-08 18:27:56 UTC

Comment 18 belongs to:


18. Sally said...
I have a goal for 2012 of trying to stress about things less, i suffer from anxiety and it really puts a hold on things i do, therefore this is the year to get it under control. I also have a goal to start my new job and enjoy it, as well as have a great year!! Hope your all have a great 2012

Congratulations, Sally!  I'll be contacting you via email to get your address...and to find out which fabulous book you'd like to receive!
Sunday, January 8, 2012

Scrapbuster Block

Hello!  I hope you're having a great weekend so far!

I think one of my favorite kinds of quilts are scrap quilts.  With the mixture of colors, tones, and fabric styles...it just feels warm and cozy.  And, it's a great way to use up all those little pieces of fabric.  Plus, I think scrap quilts make a great gift and they go with anything! 

Last week, I was asked to make an angel block for the 3x6 Mini Sampler Quilt Bee on Flickr.  The colors needed to be rainbow on a white background.  This what I decided to make:

It is a scrapbuster block using Little Miss Shabby's Scrapbuster Block Tutorial.  It was fun to make and went together quickly.  All-in-all, there are 48 little colorful squares, each finishing at 1".  I like the look of this block and am thinking of making an entire quilt out of this pattern.  She also has a tutorial for a block that's the reverse of this (white fabric where the colors are and colors where the white fabric is...but she used gray in her block), so maybe a combination of the two in a quilt would be fun.  Ready for the best part?  I really wouldn't need to buy any fabric!  I have TONS of scraps (enough for several quilts probably) and lots of white fabric...well, I may end up needing to buy a little of that, but white fabric is pretty inexpensive. 


So,  what is your favorite kind of quilt to make?
Saturday, January 7, 2012

Last Day!

Happy Saturday!

Just a friendly PSA...today is the last day to enter my fabulous giveaway.  I will announce the winner on Monday, January 9th.  If you'd like to enter, please click HERE for all the details.

Have a great weekend!!!  =)
Tuesday, January 3, 2012

Feeling Gray?

Hello!

I hope you're enjoying 2012 so far!  I've been signing up for more swaps, bees, and quilt alongs.

craftytammie.com is hosting a Shades of Gray swap.  These are the gray's I'm planning to send:

I've also signed up to design a block in Kim's Home Sweet Home quilt along at Where Creativity Blossoms.  I am so excited!  The block needs to have a tree or a house (or both)...that's the only requirement. I've been spending the last couple of days designing possible blocks.  Here is a sneak peak:
You don't think I'd show you the full blocks just yet, do you?!  My tutorial will available on my blog on March 27th...but maybe I'll show sneak peaks of the block I decide to go with before then...we'll see.  Feel free to quilt along with us.  There is a full list of where you can find all the details, as well as who will host each block, on the Where Creativity Blossoms site.  The fun starts on January 17th!

Have a great week!

Oh...there is still time to enter my New Year's giveaway!  You can win a brand new copy of the book of your choice (there are 4 to choose from).  Click here for all the info.
Sunday, January 1, 2012

Happy New Year Giveaway!

Happy New Year!!!

I thought I'd start the new year with a little giveaway...something fun to get all the projects/goals going for 2012.  You can win a brand new copy of your choice of one of the following books:
(Photo from Barnes & Noble website...click on link for more about this book)
To enter the giveaway, please leave a comment sharing one of your goals for 2012 (doesn't need to be quilting related).  You don't need to do anything else...but, if you'd like to talk about this giveaway on your blog, I'm not going to stop you.  =)  You need to enter before midnight on Saturday, January 7, 2012.  I'll announce the winner on Monday, January 9th!  Good luck!!!

Wishing you a 2012 full of love, joy, health, and prosperity!